ADVICE
If you have comments about the content of the blogs please use the comments section or contact me, and please ask any questions you might have - we can use this to improve the information we provide!
|
Choosing the correct arrow spine for your bow can be incredibly confusing and seems like a mystery that you may never get your head around. There are a lot of factors that affect correct arrow spine (like draw length but even parts of your technique like consistency, tension and execution) so, it is perfectly reasonable to feel that way. A lot of top archers find an arrow set up that works for them and stick with it, not necessarily understanding why that's the set up that worked. Here I want to break down as many factors affecting arrow spine as I can for you and explain the mechanics behind arrow flight that make the decision of which spine to use so important. Don't forget to get in touch if you want some individual advice! Here is a cheat sheet you can add to your kit. It doesn't give any explanations but describes what affects the stiffness of an arrow set up and how!
Or get the whole blog as a pdf!
What is arrow spine?
To most archers the number that describes arrow spine is just a number, you understand that a smaller number means a stiffer arrow but perhaps that’s all. In fact, the process used to give a spine measurement is incredibly simple. The most common method is the ASTM (American Society for Testing and Materials) method, used by all major arrow manufacturers of carbon and aluminium shafts. This method involves fixing an arrow shaft at two points, 28 inches apart. Directly in between the two supports a weight of 880 grams is hung. Naturally, the arrow will bend (deflect), and it is the size of the deflection that determines the spine number. The deflection is measured in thousandths of an inch, so if the arrow deflects half an inch, that’s 0.5”, then the spine number is 500.
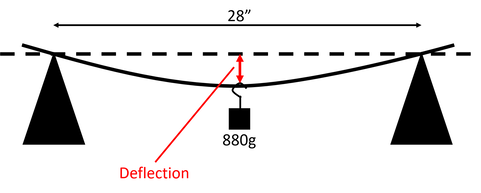 Figure 1: ASTM arrow spine measuring method Note that wooden arrows more often use the ATA (Archery Trade Association) method which involves the same set up except the supports are 26” apart and the suspended mass is 2lbs (907 grams). The resulting numbers are very similar as the closer supports should reduce the deflection but then the mass is also increased thus increasing the deflection. It is argued how to convert between the two – theoretically it should be ATA spine multiplied by 1.045 gives ASTM spine but in practice it is closer to 1.2. You shouldn’t ever really need to convert these numbers. Why does the arrow bend?
Let’s imagine a very simple set up. When you release the string it accelerates. Suppose that the string accelerates to full speed instantaneously. Then the nock must also go through the same acceleration. If the arrow was perfectly stiff, that is had a spine rating of 0, then the point would also go through the same acceleration. Of course, our arrows are not perfectly stiff. Instead, the shaft of the arrow absorbs some of that force applied upon release. So, the force must travel down the shaft of the arrow, called an impulse. That delay in the force reaching the point of the arrow means that, just for a brief moment, the nock is moving at full speed while the point of the arrow is still stationary. The distance between nock and point is therefore less than the length of the arrow so the arrow shaft must bend. Some maths for those that way inclined! The impulse is measured by the force applied multiplied by the time it takes to implement the force. So, if an arrow is perfectly stiff the arrow cannot bend and the time it takes for the impulse to travel is reduced to 0, so the impulse is 0 and that corresponds to there being no bend. If the arrow was very weak the arrow will bend a lot, it then takes a lot longer for the force to travel from one end of the arrow to the other, creating a larger impulse, corresponding to the larger bend. So, in fact, anything that affects the impulse is affecting the amount the arrow bends, and a lot more factors affect the impulse than simply the stiffness of the arrow shaft. In fact, I’ve completely ignored the fact that the nock will also morph and absorb some force in the process but that’s fine because it’s such a small factor. The key to it
An arrow that bends too much (is too weak) will fly poorly, it must be able to straighten up very quickly. However and arrow that bends too little (is too stiff) will be unable to get sufficient clearance from the bow or arrow rest. Hence the window in which we find our correct arrow spine. Figure 2: Why the arrow bends - the impulse We made some strong assumptions about the acceleration of the arrow. For a lot of modern bows, particularly compounds with cams that are not circular, the acceleration of the nock is purposefully increased over a period of time, from initial release all the way until the nock loses contact with the string. This allows bows to launch arrows at a much greater speed, but it also has a large impact on how much force is being applied and how long it takes for that force to travel from nock to point. Where the force is increased throughout the cam motion the size of the impulse travelling down the arrow is greater and so the arrow will bend more, and later in the bow window. A cam that allows for faster arrow flight will require a stiffer arrow shaft. Most modern arrow charts account for this – most accurately by considering the “hardness” of the cam. A soft cam is one that is smooth to draw and applies a consistent force, whereas a hard cam pushes the arrow more later in its rotation, applying the maximum acceleration later in the window. You’ll see spine charts suggest stiffer arrows for harder cams in line with this effect. A hard cam is usually considered as one that shoots arrows at 300fps (IBO) or greater, which covers most modern cams. We can already see that the speed at which the bow shoots an arrow, as well as how smoothly it accelerates the arrow, affects how stiff we need our arrow spine to be. Where does it bend?
For those using release aids there is no horizontal movement (or at least there shouldn’t be) upon release and so the arrow doesn’t have this guidance of where to bend. Instead, a vertical force needs to be introduced. This is so that the arrow, particularly the vanes, have good clearance above the arrow rest. To ensure this some compound bows are set up so that the nock travel is not perfectly straight, rather it moves the nock upward slightly, others require their nocking points be positioned marginally above centre. Either way this introduces a very slight vertical force and so the arrow is encouraged to bend vertically. Simply put, the arrow will bend in the direction it finds the easiest, so consistently placing a small force upward or sideways ensures the bend occurs in the direction it is needed. Figure 3: The direction of force that makes the arrow bend horizontally for finger releases and vertically for release aids Now, what about where along the arrow the bend occurs? When you simply have a shaft with no components on it and you just hang a weight from the centre the arrow will of course bend where the weight is, in mathematics we would say we are modelling the arrow as a light uniform rod. But we aren’t in this perfect world where chickens are all spherical. Instead, the force is being applied not at the centre of the shaft but at a slight angle at one end of the shaft. Moreover, the arrow is not uniform because its centre of mass is not in the centre, it is closer to the point of the arrow because the components all add weight. How does this affect the arrow bend? To get to the answer we first need to understand the oscillation of the arrow. Of course, as the arrow flies the arrow as a whole is moving toward a point on the target. However, most of the points on the arrow, certainly early in the arrow flight, are not travelling directly there. They are wobbling up and down or left and right. The reason the arrow continues towards this one point is that for every point of the arrow applying a force in one direction there is another point of the arrow applying the equal force in the other direction. Even amongst all this wobbling there are two points on the arrow, called nodes, that don’t wobble, they travel exactly along the flight path of the arrow. Consider a rope, if you’ve not done it yourself you’ve probably seen the popular exercise that involves moving a rope up and down to force it to make waves. Those waves are oscillations. The vertical force you’re applying at one end of the rope is similar to the force your bow applies to the nock. As you settle into a rhythm different parts of the rope move up and down, some parts of the rope move more than others, and there are at least two points along the rope that don’t move at all. The same thing happens with your arrow. The nock is moved slightly off the flight path causing an oscillation. No further force is applied once the nock leaves the string, so the oscillation is fixed. That means, like in any oscillating system, there must be some nodes, some points that don’t wobble. The amplitude of the oscillation is how much the arrow bends at it’s most. That spot of maximum bend will be halfway between the nodes; however, the nodes will not be evenly spaced from each end of the arrow. Because the arrow carries more weight at the front because of the arrow point, the nodes will be closer to the front of the arrow, and so the position at which the arrow is bending the most is nearer the front as well. Figure 4: Oscillation of an arrow showing the nodes Practical; You can very easily find where the nodes on your arrow are. Around about an inch to two inches from the point of your arrow grasp the shaft between two fingers. Make sure your other fingers are well out of the way so they will not touch any part of the arrow. Now firmly hit the arrow against your leg near the vanes. You will feel the arrow vibrate, and it’s showing you the natural oscillation of your arrow. Now move your fingers along your arrow shaft a small amount and repeat. If the arrow vibrates for longer you have moved closer to your node, if it stops vibrating sooner then you have moved away from your node. If it doesn’t vibrate at all you are a long way from your node. You can keep adjusting until you find the spot that the arrow vibrates for the longest, normally a fair few seconds, and that is one of the nodes of your arrow. Of course, you can do this to find the other node as well, roughly the same distance the other side of the centre of mass of your arrow as the first node was. The reason this works is because when your fingers are pinching the arrow a long way from the node you are preventing the part of the arrow that wants to wobble from wobbling. Whereas when you pinch it exactly where the node is you are pinching the arrow in a place that doesn’t want to move anyway, so you’re allowing all the parts of the arrow that want to wobble to do so. Mathematicians and physicists call this damping. If you could watch your arrow flight accurately you would find that the nodes of the arrow were the points of the arrow that followed the arrow’s flight path to the target, not the point itself as is often thought. Figure 5: Arrow oscillation in flight showing the nodes following the flight paths So, the bend of your arrow is changed by how the arrow is set up. It is also changed by the length of the arrow. Even in the controlled conditions used to test the arrow bend, if the test were done by pinching the arrow at 30” rather than 28” you would get more deflection, similarly you get less deflection if you pinch it closer together. In our arrow flight the same thing is happening with respect to the nodes of the oscillation rather than a place you pinch the arrow. If the nodes are far apart the arrow will be able to bend more, signifying a weaker arrow. If the nodes are closer together the arrow will bend less, signifying a stiffer arrow. So, a stiffer arrow spine will always have nodes that are closer together than a weaker arrow spine, but the stiffness of the spine isn’t the only thing that affects how far apart the nodes are. By making the arrow longer we move the nodes further apart, so an archer with a longer draw length will have arrows that bend more and so will need to use a stiffer spine arrow than an archer with a shorter draw length, and vice versa. We can also use a heavier point in an arrow as this moves the node nearest the point closer to the end of the arrow, that means the nodes move further apart and the arrow can bend more. So, a heavier point effectively weakens the arrow, while a lighter point will stiffen the arrow. Example: An indoor arrow is often very stiff due to its width. Archers will often leave indoor arrows much longer than needed and use heavier points, both of which act to weaken the arrow as a whole. Example: An archer thinks their groups aren’t as good as they should be. They think it’s because their arrow is flying poorly as it’s too weak. They can try using a lighter point (though this may mean the arrow drifts more in the wind) or they can try cutting the arrow shorter (though this is irreversible). Interestingly they could also try fletching their arrows helically to help their arrow straighten up faster and improve its flight (though this also slows the arrow down which may make it harder to reach distance or cause more wind drift). What makes an arrow good? The two main factors I use to quantify the appropriateness of an arrow to my set up are grouping and forgiveness. There are a lot of factors you can control when choosing your arrow set up, but these two factors are the things you’re want to achieve. A stiffer arrow will group better as the arrow flight is straighter, thus generally more consistently, all the way until the arrow reaches the point of too stiff to avoid contact, when the grouping rapidly declines. However, forgiveness is much more difficult to attain. It depends on the location of the nodes in respect to the arrow rest, but also where the arrow rest can be placed in relation to the throat of the grip. It also generally needs a heavier point up to a threshold of easily reaching the distance. Moreover, a slower arrow is more forgiving but won’t group as well at distance due to atmospheric conditions, not just wind, so fletching offset or helically can help or hinder. 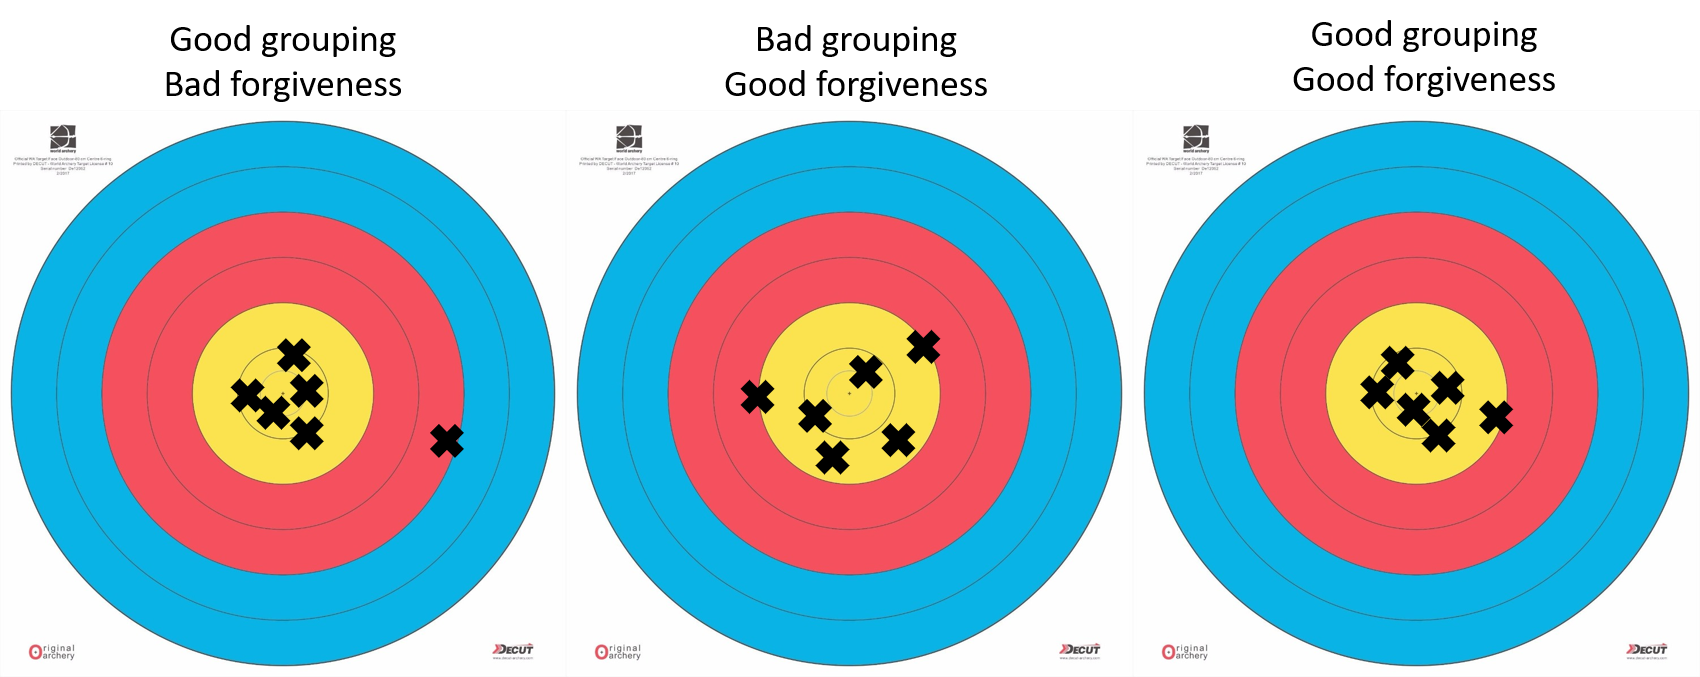 Figure 6: The difference between grouping and forgiveness Which do you want first, the good news or the bad?
The bad news is that it’s really complicated, and you can’t always find the perfect set up, often a compromise is needed between grouping and forgiveness and even getting close to either can be a challenge. The good news is that it doesn’t need to be a big mystery and that you’ve got so many things to play with that given enough time experimenting you can always find a set up that works for you. In summation There are two mathematical principles that affect the quality of the flight of an arrow: impulse – how much force is applied to the arrow, at what direction, and for how long, and oscillation – the location of the nodes of the arrow. The style of the bow, the cam shape (if a compound), the limb materials, the string material, the string thickness, the poundage, amongst others, can all affect the impulse. The arrow spine, length, components and the placement of those components can all affect the oscillation. So, if you ever think matching your arrows correctly is difficult, you’re right, but it needn’t be a mystery.
|
||||||||||||||||||||
|
|
InFocus Archery Coaching
|
|
 RSS Feed